
Where to start laying laminate flooring in a room
Planning and preparation are key in laying laminate flooring in your room. The first step is to measure the room and calculate the number of laminate boards you’ll need. You should also make a plan to ensure you know where to start laying the laminate flooring boards. This will help you create a smooth, even finish as well as avoid wastage.
Let’s get into the details and discuss what else you’ll need to do for proper preparation:
Clear the room of furniture
Before you begin laying the laminate flooring boards in your room, it is important to make sure that you have cleared the room of any furniture and other objects. This will help ensure that you have an even surface for the boards to be laid on and make it easier to move them into position.
You must also ensure that the subfloor is clean, dry, and free of debris or obstructions, such as nails or tacks. It is important to check if the subfloor needs additional preparatory work added before installing laminate such as repairs, adding underlayment or treating certain areas with a moisture barrier product. These step would need to be carried out first before moving on to installation of the boards.
In addition, you should allow any new flooring material, particularly glueless laminate planks and tiles, to rest in their original packaging in the same environment where they will be installed for at least 48 hours prior actually placing them . This process helps accommodate any expansion or contraction due to humidity changes in different environments allowing for a seamless fit once installed.
Measure the room and purchase the necessary amount of laminate flooring
Before beginning the installation of laminate flooring, you should measure the room and determine the amount of laminate needed. There are several factors to consider when calculating the number of boards needed for a room:
- Measure both the length and width of the area being covered.
- Depending on how large your room is and how wide your chosen flooring boards are, you may need to add an extra piece of laminate to account for any irregularities in the wall.
- To provide an additional level of accuracy, it’s recommended that homeowners add an extra 10-20% to their order in case they need additional material at some point during installation.
After determining exactly how much flooring you will require, visit a home improvement store or online retailer to make your purchase.
Check the humidity of the room
Before beginning the process of laying down laminate flooring boards, it is essential to check the humidity level to ensure it falls within the guidelines for a successful installation. Laminate is sensitive to moisture, so installing laminate flooring in a room that is too humid can lead to damage from buckling and expansion.
Excessive moisture in the air can also cause small warping of the wood preventing the Laminate flooring boards from securely locking together, and will cause gaps between them.
The first step in preparation for installing laminate flooring: Check your indoor relative humidity level with an accurate digital hygrometer or gauge. The ideal indoor relative humidity should fall between 40% and 65% RH (Relative Humidity) during installation as it should also remain after installation as fluctuations in humidity levels afterward may also contribute to buckling or warping of your laminate floor.
Layout
When you are laying a laminate floor in a room, the most important part of the installation process is the layout. If you start laying the boards from the wrong spot in the room, the finished floor might not look the way you intend. To make sure it looks great, it’s important to plan the layout first.
In this article, we will discuss the best way to start laying laminate flooring boards in a room:
Determine the direction of the boards
When laying the laminate flooring boards, it is important to consider the direction of the boards relative to the room’s layout. If a room is long and narrow, it is best to lay the boards parallel or lengthwise with the longest wall. For rooms that are square or roughly equal in length and width, laying the boards away from a window or doorway can create a desirable effect as light will reflect off of them. As always, measure twice before cutting; this will help ensure you have enough material for your installation.
Other factors like foot traffic flow, furniture placement and style should also be taken into consideration when selecting a pattern for your laminate flooring installation. A herringbone pattern is often used in more formal settings while a chevron design can be used to draw attention in smaller spaces. Planning ahead and making sure all materials are present before beginning an installation will result in fewer headaches down the road!
Place spacers around the perimeter
Before you start laying the boards, it is important to place spacers around the perimeter of the room. This will ensure an even gap between the boards and other objects, such as walls. Use a tape measure to mark the floor in increments corresponding to the width of your plank; for example, if you have a plank width of 8 inches (20 cm), mark every 8-inch (20 cm) along the periphery.
Once marked, insert plastic or rubber spacers into each area and gently tap them into place until they are flush against each other and also against any walls or objects that meet with the edges of the floor. These spacers will serve as temporary support for any boards you lay next to them.
Mark the first board
Before laying your laminate boards, it is important to mark out the first board. This process will ensure that the boards are being laid in the correct direction and that the pattern of each board matches up with those around it.
If you are installing single-strip boards, line up one end of a board along the start line, making sure that the arrows on the board are pointing in the same direction as those provided by your manufacturer for installation. Pre-mark a chalk line which indicates where both ends of each board should lie and nail in any expansion strips.
Measure out several different spots along the wall to check if they are all consistent, using a spacer or T molding to keep an equal distance between each one.
Installation
Installing laminate flooring can be a bit intimidating if you’re doing it for the first time. However, the process can actually be quite simple if you know where to start.
In order for you to begin laying your laminate flooring boards, the first step is to figure out where in the room you should start. This will depend on the size, shape, layout, and location of the room. Knowing this information will help you plan out your installation process.
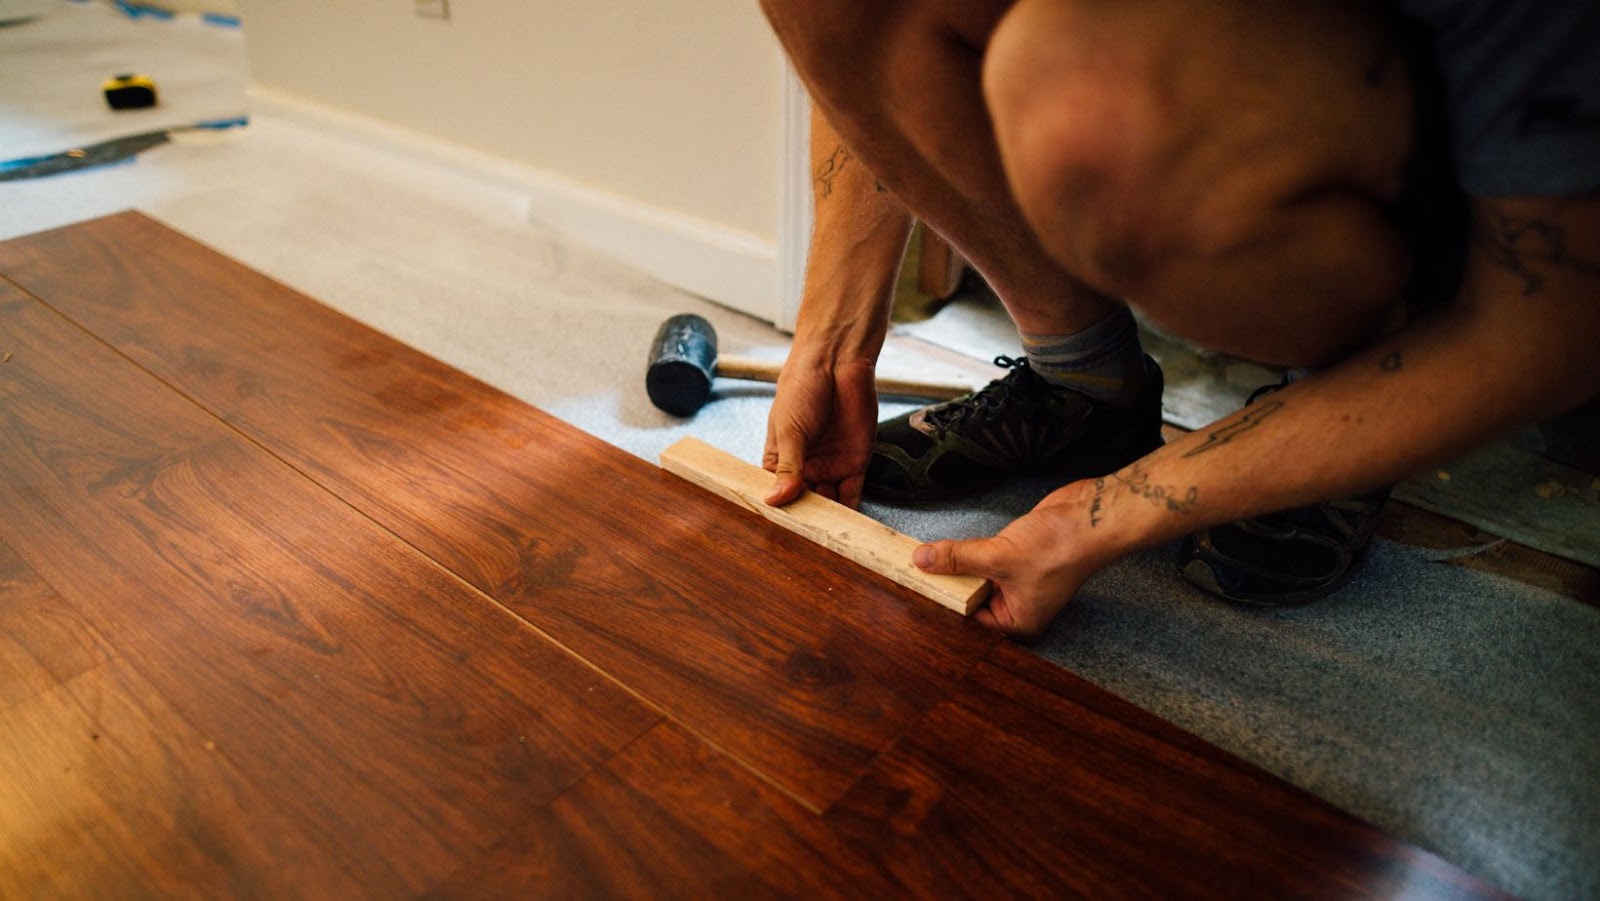
Start laying the boards from the marked spot
Starting from the chosen spot, begin installing the laminate flooring boards. Make sure to leave space for expansion throughout, which is commonly known as a “gapping” of around 5-10mm. You may need to leave more space if you are installing the laminate in a larger area, such as a living or dining room.
If installing your flooring from wall to wall, start at the one side of the room and make sure that it is level with the opposite wall so that all aspects of your floor will be straight and even. If there is an existing baseboard or wall finish that is not level with the edge of your chosen installation point, simply adjust this before starting.
Most types of laminate boards should be laid directly onto a suitable subfloor; however there may be specific instructions that come with your type of board. Make sure to follow these instructions whenever possible, as this will ensure a stable and secure finished product.
Before beginning each row, use your tape measure to ensure that all boards are cut properly and while laying each row place weights onto any newly installed areas in order to hold them firmly in place until they have had time to stick avoiding any creeks throughout when finished walking on top of them.
Once you have laid each row up against each other, firmly press down on them with both hands using even pressure while gently rocking back and forth across their entire width; this helps stick together any tongue-and-groove pieces used for your particular type of flooring design helping connecting rows being securely adhered towards one another before moving further on towards completing each room’s full install.
Cut the boards to fit around doorways and other obstacles
Before installing your new laminate flooring, it’s important to measure carefully and cut the boards to fit around doorways and other obstacles. This process involves making precise cuts with a saw. The most common types of saw used for cutting laminate boards are jigsaws, circular saws, or miter saws.
To start, measure the room’s length and width along the wall surfaces where the flooring will be installed. Determine which direction the planks should run: parallel with longest walls presents a more pleasing appearance. The vast majority of planks come in a minimum size of 12-inches wide by 48-inches long, so it’s helpful to make note of how much extra material is needed before beginning any cutting.
Once you have an accurate understanding of how much board material is required for each side and end joint cut, then use this information to mark your boards accordingly in preparation for cutting them. For example, if an angled end joint is being created at a doorway or between two pieces of furniture that are at different heights from each other, then use a protractor or framing square to determine what angle the board must be cut in order for them to fit properly together upon installation. It is always best practice when creating end joints to take into consideration the skirting boards as well so that an aesthetically pleasing result can be achieved when laying down the planks against each other during installation.
Finally, use a sharp blade on your saw when making cuts – preferably one designed specifically for cutting laminate boards – and adhere strictly to safety guidelines when doing so!
Secure the boards with adhesive
Once the boards have been cut and placed in their positions, there are several methods to secure them. Adhesives are one of the most secure methods for installation and are recommended for a better finished look.
If adhesive is being used, as it is with most laminate flooring projects, begin placing the adhesive on the subfloor near any walls. Keep in mind that an odd number of boards must be prepared with adhesive since both end boards must be connected to adjacent sides. Then begin securing the planks along the walls, working outward from that edge as you continue expanding into your room.
Where possible, use spacers between each board and always adhere to manufacturer’s instructions during installation. When connecting a board to an adjacent side, use a rolling pin or credit card-sized tool to ensure that it carefully adheres to the adhesive. This will help create more structural integrity when using adhesives for installation and will also help reduce any gaps between pieces of laminate flooring panels. Also use light pressure when connecting pieces together to avoid pushing any adhesive from within the joints or breaks in grout lines down into your underlayment below.
With regular check-ins on evenness during every step of construction, it’s easy to create a great finished product with successful laminate flooring installation!
Finishing
When it comes to determining where to start laying laminate flooring in a room, it’s important to be mindful of the finishing touches you will need to complete. There are several factors to take into consideration when deciding where to start laying laminate flooring boards in a room, such as:
- The size of the room
- The size of the laminate boards
- The overall look you are trying to achieve
Let’s discuss these in more detail.
Install the transition strips
Once you have laid the rows of laminate flooring boards, it’s time to install the transition strips. Transition strips prevent your floor from shifting and becoming damaged. They will be placed at any doorway openings, along stairs, and anywhere there is a change in height in adjoining rooms.
Start with the doorways: measure your doorway opening and use a reciprocating saw or jigsaw to cut the transition strip to fit. Pre-drill holes for screws and use a countersink drill so that you can put plugs over them later. Place the transition strip up against the baseboards, using a funnel or scrap piece of wood as a guide for positioning it properly (leverage it carefully between scrap pieces of wood and furniture). Secure it with screws, making sure not to damage any protected wiring or plumbing that may be behind your wall.
For higher thresholds due to changes in height between adjoining rooms (also known as reducers), secure them in place similarly with screws, taking extra precautions not to damage existing protected wiring or plumbing. Make sure all transition strips are flush with each other where they meet up near doorways—this will ensure you have no gaps in your laminate floors when transitioning from one room to another. As always, if needed use caulk on interior walls around transitions for added security.
Trim any excess boards
Once all of the laminate flooring boards have been installed according to the manufacturer’s instructions, you should take a good look at them to make sure they are placed as accurately as possible. If there is any excess board that is hanging off at either end, use a router or circular saw to trim it off evenly so that the edges are smooth and flush with the wall line. Doing this now will prevent future problems from arising such as snagging on furniture feet or carpet fibers and will give your new laminate floor a finished, polished look.
Clean the floor to remove any debris
Before starting to lay your laminate flooring boards, it is important to clean the area thoroughly to ensure proper adhesion. Make sure that the surface is free of dirt, dust and debris, including any oil or grease stains. If there are any holes, cracks or other defects in the subfloor, make sure to fill them in with a suitable repair material before laying the floor.
If there are pieces of hardwood left over from tearing out an old floor, make sure that they have been removed and disposed of so that they do not create a bumpy surface. You should also apply a vapor barrier if the room is below grade. Lastly, check for existing unevenness in the subfloor—typically caused by previous floors—and level out any high spots with a self-leveling compound before starting your laminate floor install.
More Stories
Home Care Agency Services: Beyond Personal Care
Add Some Personality into Your Home with Creative Designs
Types of Fire Alarms: Selecting the Ideal Solution for Your Safety